Boulangerie is a SwiftUI bakery operations app for small bakery teams that want production,
POS, HACCP, recipes, and reporting in one workspace. This page turns the product README into a
practical setup path so a new device can go from sample mode to real bakery use with less guesswork.
Best for
Small bakery teams that want one app for the bake day, front-counter sales, compliance, and review.
Device roles
Each device is either Production or Back Office, with different workflows and reporting scope.
Trial mode
The app can be explored with read-only sample data before you unlock editing and operational actions.
Use Production on the bakery floor. This role includes the full operational workflow:
Day, Timers, POS, HACCP, Transactions,
Calculator, Products, Reports, and Settings.
Back Office devices
Use Back Office for administration and analysis. This role focuses on
Reports, Transactions, Recipes, Products, and Settings.
If you deploy more than one device, give each installation a distinct location slug and device slug so imported and exported data stays identifiable.
Set up the bakery
These first six steps establish device identity, access level, catalog structure, compliance tasks, and recipe reuse before the bakery starts live production.
1
Open Settings first
Before entering live data, configure the installation in Settings:
brand name, location slug, device slug, device role, operating currency, and mixer batch size.
These values determine how the app identifies this device and how reporting data is grouped later.
2
Decide how this device will be used
Pick one role per device. Choose Production for the bakery floor and
Back Office for reporting, auditing, and admin review.
Production devices are limited to their own source. Back-office devices can review the current source, selected sources, or all known sources.
3
Unlock or restore full access
Trial mode keeps the full app visible, but editing and destructive actions stay locked.
Open Settings to purchase full access or restore a previous purchase.
After unlock, the app asks whether to keep the sample data for onboarding or clear it and start with a clean store.
4
Build the product catalog
Go to Products and create the items you actually sell or produce:
product name, price, weight, dough weight, dough group, POS status, stock policy, label copy, allergens, and nutrition.
Same Day: tied to the daily production sheet and same-day leftovers.
Rolling Stock: sold from carry-over stock.
Untracked: available in POS and reports without stock limits.
5
Configure HACCP tasks
The daily HACCP screen depends on task setup in Settings.
Add the checklist your bakery actually uses, choose frequency, pick input type, and set numeric targets where needed.
Reorder the tasks into the same flow your team follows during production and service.
6
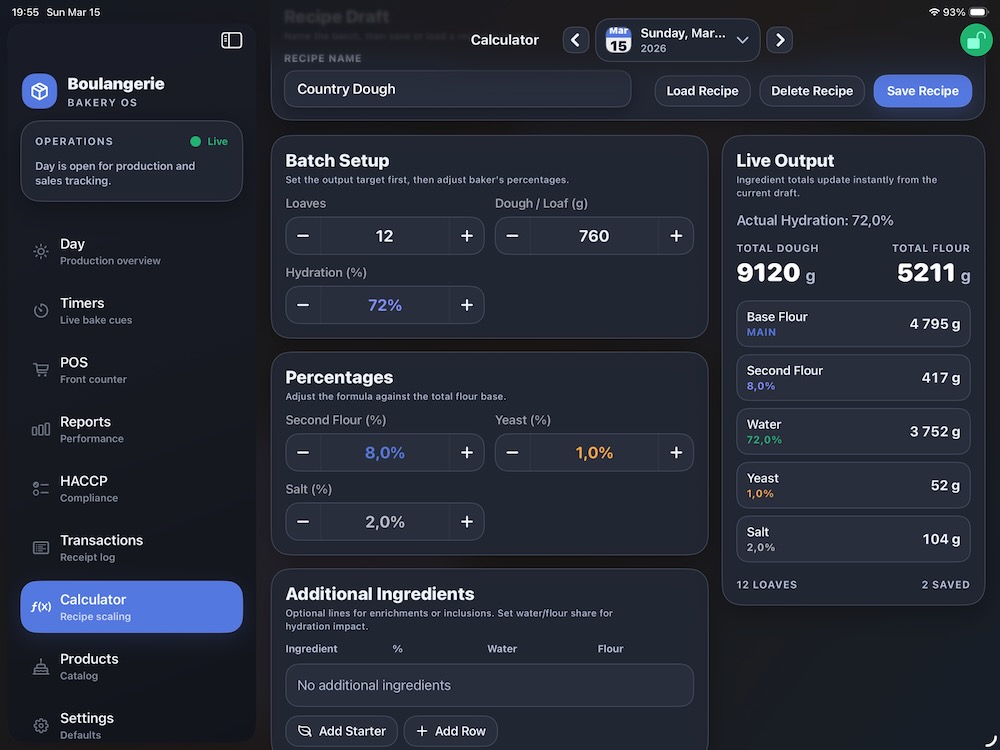
Prepare recipes in Calculator
Save reusable dough formulas before production begins. You can set loaf count, dough weight per loaf,
hydration, second flour, yeast, salt, enrichments, and starter rows while reviewing live totals.
Saved recipes make the calculator useful both for planning and for quickly scaling dough-plan rows later.
Brief note on sourdough and starter
If your bakery makes sourdough, it helps to distinguish the finished dough from the preferment that seeds it.
Sourdough: the final bread dough made from flour, water, salt, and a fermented culture.
Starter: the live fermented culture, sometimes called levain or mother starter, used to raise and flavor the dough.
In practical bakery terms, starter is an ingredient inside a sourdough formula, not the whole formula by itself.
Because starter usually contributes both flour and water, it changes the real hydration of the dough.
In Boulangerie's Calculator, starter works best as an additional ingredient row.
That lets you record how much starter is added, how much of it counts as water, and how much counts as flour,
so the app can show a more realistic dough weight and actual hydration for sourdough formulas.
Core screens you'll use most
The production workflow stays centered on a few operational screens: the day board, timers, calculator, and POS.
Day board: baked, sold, leftovers, and production status in one place.Timers: follow each batch through bulk, bench, final proof, and bake.Calculator: scale formulas and save reusable dough recipes.POS: search, favorites, cash or card checkout, and receipt capture.
Run and review the bakery day
Once setup is done, the second half of onboarding is learning the daily cycle from production through reporting and closeout.
7
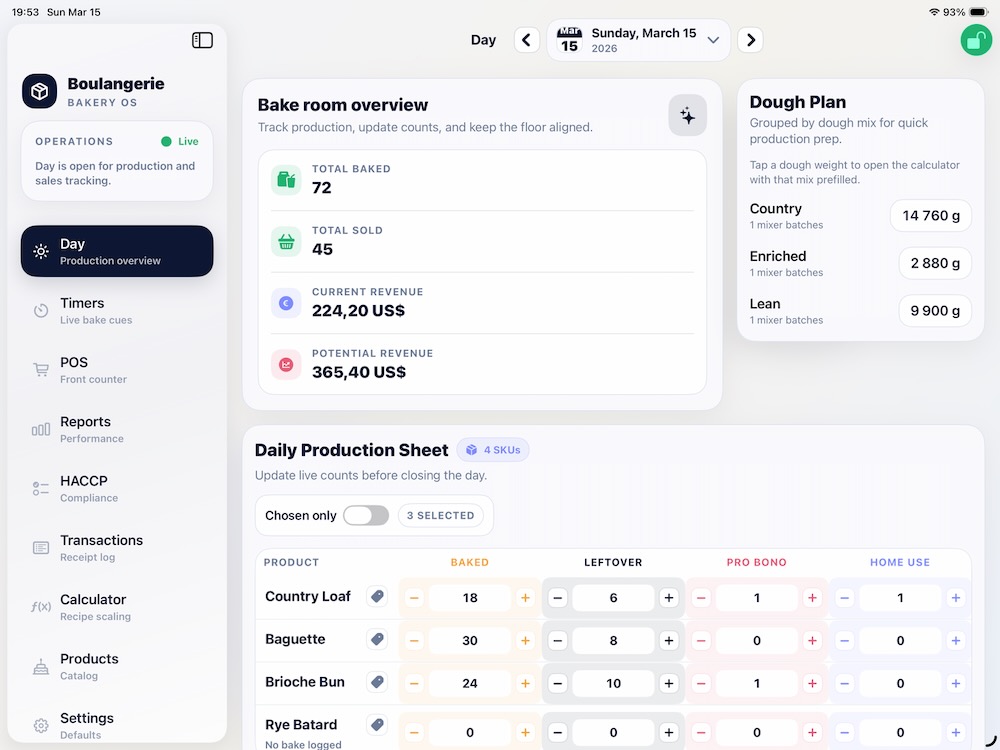
Start the bakery day
Open Day and choose the correct business date from the toolbar date picker.
This screen is the daily production center for baked, leftover, pro bono, and home-use quantities.
It also helps with dough planning, revenue versus potential revenue, chosen-product filtering, and label printing.
8
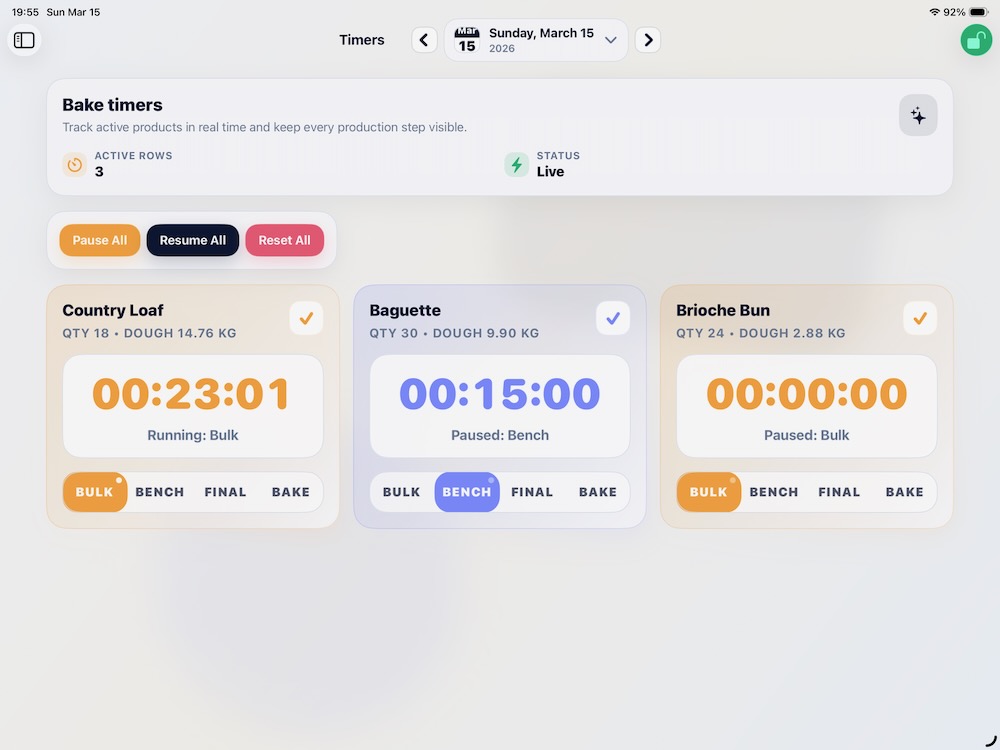
Run timers during production
After baked quantities are logged, use Timers to manage active products.
Each timer shows product, baked quantity, estimated dough amount, elapsed time, and the current stage.
Stages: Bulk, Bench, Final, and Bake.
Controls: pause, resume, reset, or complete each timer.
9
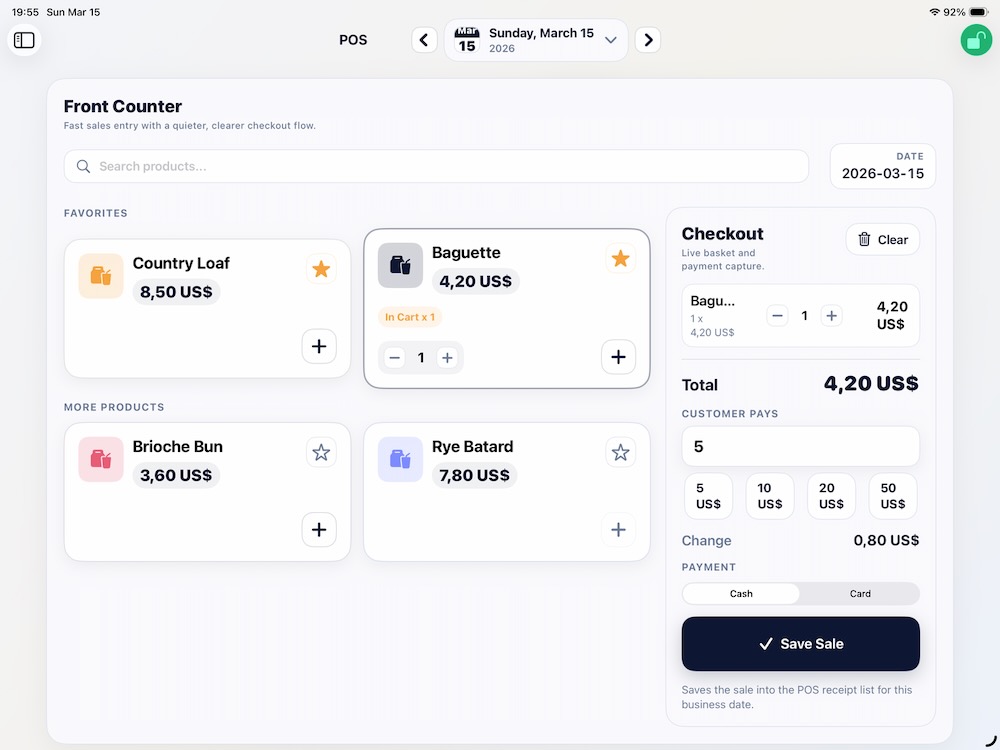
Sell from POS
Use POS for front-counter service: search products, add items to the cart,
mark frequent sellers as favorites, adjust quantities, choose payment type, and save the sale.
Cash sales can capture amount paid and change due.
POS is locked in trial mode, when the day is closed, or after a posted daily summary receipt exists for that day.
10
Reconcile with Transactions
Review receipts for the selected business date in Transactions.
This is the audit screen for receipt count, posted versus voided status, turnover, average ticket size, and daily summary status.
11
Review performance in Reports
Move from operations into analysis with Reports: total revenue, order count, average and median ticket,
hourly and weekday patterns, leftovers, top products, bake balance, recommendations, and export preview.
Back-office devices can widen the reporting scope beyond the current device and consolidate multiple sources.
12
Close the day
When the figures are final, close the day from the main toolbar.
Closing locks further operational edits for that source and date, preserves the day as a finalized record, and supports cleaner reporting.
If corrections are needed later, the day can be reopened.
Suggested daily workflows
Boulangerie is intentionally organized around the bake day, but the order of work shifts depending on whether the device lives on the bakery floor or in the back office.
Production device
Settings: confirm device identity and defaults.
Products: verify the day's catalog and POS-active items.
Day: log planned production and update quantities through the day.
Timers: track active batches.
POS: record live sales.
HACCP: complete due compliance checks and incidents.
Transactions: audit receipts and turnover.
Reports: review outcomes and recommendations.
Close the day.
Back-office device
Settings: configure device role and source scope.
Products: maintain the shared catalog.
Recipes: maintain formulas.
Transactions: inspect receipt history.
Reports: compare periods, products, and bake balance.
Data, devices, and real-world use
What is stored locally
Products, day inventory, and closed-day status
Receipts, stock adjustments, and saved recipes
Favorite POS items and timer state
HACCP templates, logs, and incidents
Selected date, currency, and device identity settings
What can be transferred
Settings includes import and export flows for catalog data and reporting data.
This supports moving data between devices or preserving operational state outside the current installation.
For teams using multiple devices, consistent location and device slugs make later consolidation much cleaner.
Practical notes for live bakeries
Treat Settings as part of setup, not an afterthought.
Build the product catalog before relying on POS or production counts.
Use Same Day stock only for products that truly belong on the daily sheet.
Complete HACCP setup before production uses the compliance board.
After unlock, a clean store is usually safer for live operation than reusing sample data.
Close each day consistently to keep reporting and bake-balance metrics meaningful.
Summary
The simplest live rollout is: configure Settings, unlock the app, build Products,
set up HACCP, save a few core Calculator recipes, run operations through
Day, Timers, and POS, then audit in Transactions
and review outcomes in Reports.